How to configure the environment for developing the SharePoint 2013 App in Development server.
To develop the new SharePoint paradigm apps in development environment you need to do lot of configurations
on your local server.
on your local server.
In first time its bit tedious for even experienced IT pro,When configuring,I met new challenges and exceptions details which guides me to set up the environment.
Here is the whole compiled information which I hope helpful for the beginners to set up the SharePoint environment and invest huge time on developing the SharePoint App rather than setting up or configuring.
Prerequisites can be divided into three categories for developing the SharePoint 2013 App in local server
- Infrastructure
- Domain Controller
You can see this very simple and straight forward video for how to promote your locally installed OS Windows 2008 R2 to "Domain Controller".
http://www.youtube.com/watch?v=O4PhcnV8gSs
- DNS settings
1,Start -> Administrative Tools ->DNS2,Expand your local server and click on the "Forward Lookup Zones"
3,On the right hand side you will see your fully qualified domain name which created earlier.4,Right click on your domain name and select the context menu "New alias(CNAME)".
5,Type the "wild card" in the alias name text box and your domain name in the FQDN for the target host.
3,On the right hand side you will see your fully qualified domain name which created earlier.4,Right click on your domain name and select the context menu "New alias(CNAME)".
5,Type the "wild card" in the alias name text box and your domain name in the FQDN for the target host.
Once you have created the DNS just ensure the created DNS is working fine by running the ping dos command
Next step
Create a new user in your active directory
Start->Administrator Tool -> Active directory users and computers.
After made this user as "Domain Controller" to log on the same server with newly created active directory user account instead of using the System account.[System account cannot be used to install the SharePoint App through visual studio on the local machine].And also this steps help you to log on the same server otherwise you will get the "Can't logon because the logon method you are using is not allowed on this computer" exception.
2,Software
- Visual Studio 2012 with registry changes.
steps :
Verbose logging in Visual Studio 2012
Follow these steps if you want to turn on verbose logging:
- Open the registry, and navigate to HKEY_CURRENT_USER\Software\Microsoft\VisualStudio\11.0\SharePointTools.
- Add a DWORD key named EnableDiagnostics.
- Give the key the value 1.
- Installing Office Component tools for SharePoint.
below post will helps you how to install Office Developer Tools.Download the WebPI (WebPlatform Installer) to download the office developer tools and assemblies required for developing the SharePoint App on your local server.
- 3,SharePoint related configuration
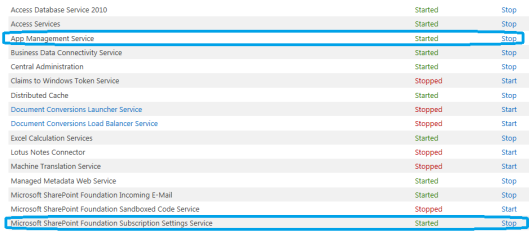
- User Profile Service
- App Management Service and
- SharePoint Foundation Subscription Setting Service.
Go to your Central Administration Page ->System Setting -> Click on "Manage Services on this server" link ensure the above listed services are up and running.
Now create the new managed account to create / manage the below services.
Microsoft best practices suggests that you should not use the "System Account" to manage the Service applications in the SharePoint due to Load balancing on the Application Server and security context.
Microsoft best practices suggests that you should not use the "System Account" to manage the Service applications in the SharePoint due to Load balancing on the Application Server and security context.
As you are going to develop the SharePoint app on the same local server you can use the previously created user in "Active Directory" for managed account.
Run this SharePoint Powershell command
$account = Get-SPManagedAccount "domain\user" example: //Murugesan\User01
//New ApplicationPool for AppManagement Service and Subscription Site Settings service
$appPoolSubSvc = New-SPServiceApplicationPool -Name SettingsServiceAppPool -Account $account
$appPoolAppSvc = New-SPServiceApplicationPool -Name AppServiceAppPool -Account $account
$appSubSvc = New-SPSubscriptionSettingsServiceApplication –ApplicationPool $appPoolSubSvc –Name SettingsServiceApp –DatabaseName SettingsServiceDB
$proxySubSvc = New-SPSubscriptionSettingsServiceApplicationProxy –ServiceApplication $appSubSvc
$appAppSvc = New-SPAppManagementServiceApplication -ApplicationPool
$appPoolAppSvc -Name AppServiceApp -DatabaseName AppServiceDB
$proxyAppSvc = New-SPAppManagementServiceApplicationProxy -ServiceApplication $appAppSvc
$proxyAppSvc = New-SPAppManagementServiceApplicationProxy -ServiceApplication $appAppSvc
After completion of the above step,ensure all the relevant service application and its proxy services are started and check the "DB creation" on your SQL Instance.
I would suggest you to install the SQL Server with mixed authentication mode.When you log in as different account in the same server it will be useful to open the SQL Server DB for managing the User Permission in "App Management Content DB" [It shouldn't replicate on the production server].
Now go to Central Administration Page,Under "Application Management" click on "Manage Service application" and ensure the services which you have been created from the above SharePoint Shell Script.
Like this.
Now got your SQL Instance where your service "Manage App Service enabled" and check your account has dbowner permission and SPDataAccess Permissions.
Now good to go to create your App catalog site on your local server.On Central Admin site click on "Apps" link it will open the screen like this,
 Click ok on this page and come back to "Management" header click on "Manage App Catalog" to create your app site on you local server.
Best luck ahead !


